IKEA BESTA Wall Units: Anchoring Them Safely in a London Rental
Renting a home in London often means making the most of every inch of space. That’s one reason why IKEA BESTA assembly has become so popular. The modular storage system offers a clean, modern look while helping tenants organise living rooms, home offices, and media spaces without taking up unnecessary floor space.
However, installing a wall-mounted BESTA unit involves more than simply following the instruction manual. In rental properties, tenants must balance furniture safety with tenancy agreements, different wall materials, and the need to avoid expensive repairs when moving out. Getting it wrong could lead to damaged walls, unstable furniture, or even safety risks.
According to IKEA, all BESTA cabinets should be secured correctly to reduce the risk of furniture tipping or falling. Choosing the right fixing method depends entirely on the wall construction, not just the furniture itself.
Why London Rental Properties Need Extra Care
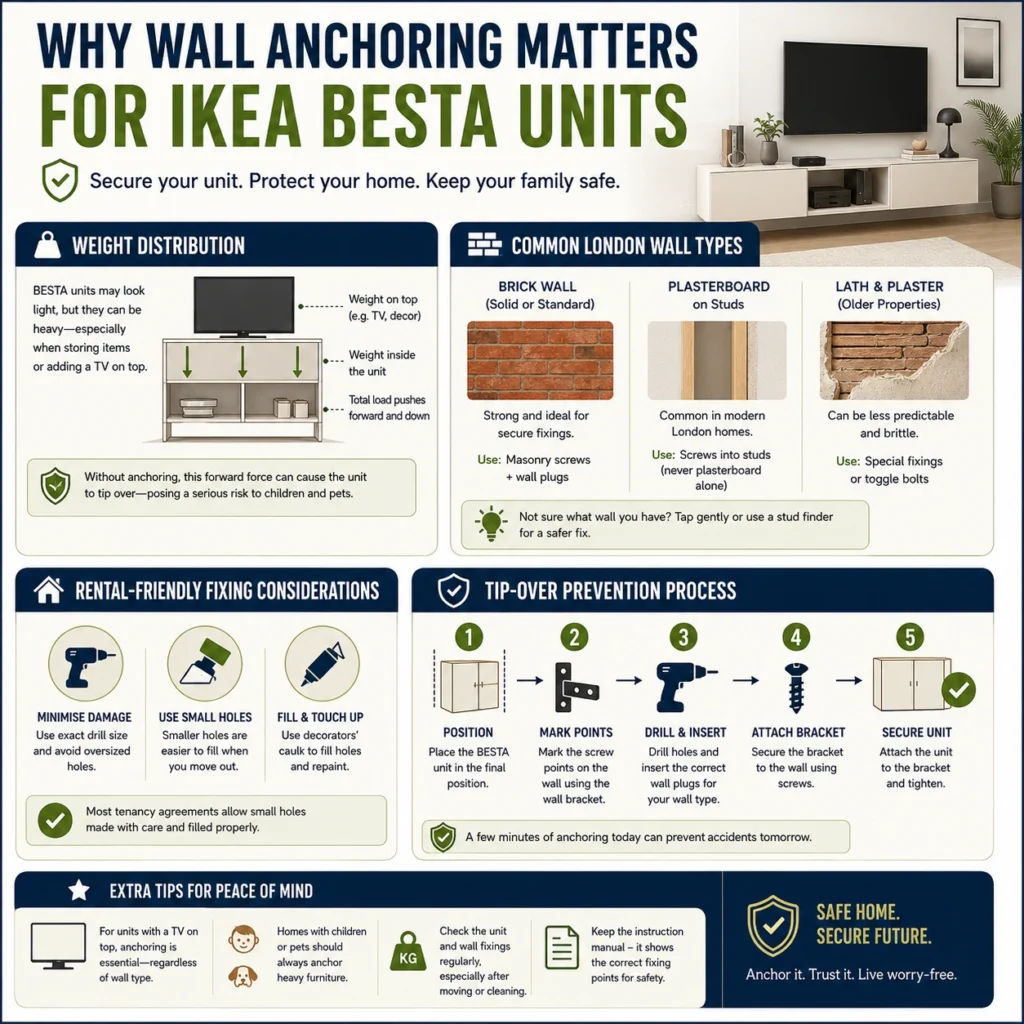
Unlike new-build homes, London rental properties vary enormously in construction. One flat may have solid brick walls, while another uses plasterboard fixed to timber or metal studs.
This difference matters because the same fixing cannot safely support every wall type.
Many tenants assume the screws included with furniture are suitable for every installation. In reality, IKEA specifically advises that the correct wall fixings depend on the wall material, and suitable screws or plugs may need to be chosen separately.
Landlords may also require permission before drilling into walls, particularly in listed buildings or professionally managed apartments.
Taking a few minutes to check your tenancy agreement before starting can save time, money, and disputes later.
Understanding How IKEA BESTA Is Designed
The BESTA range is different from many free-standing storage units.
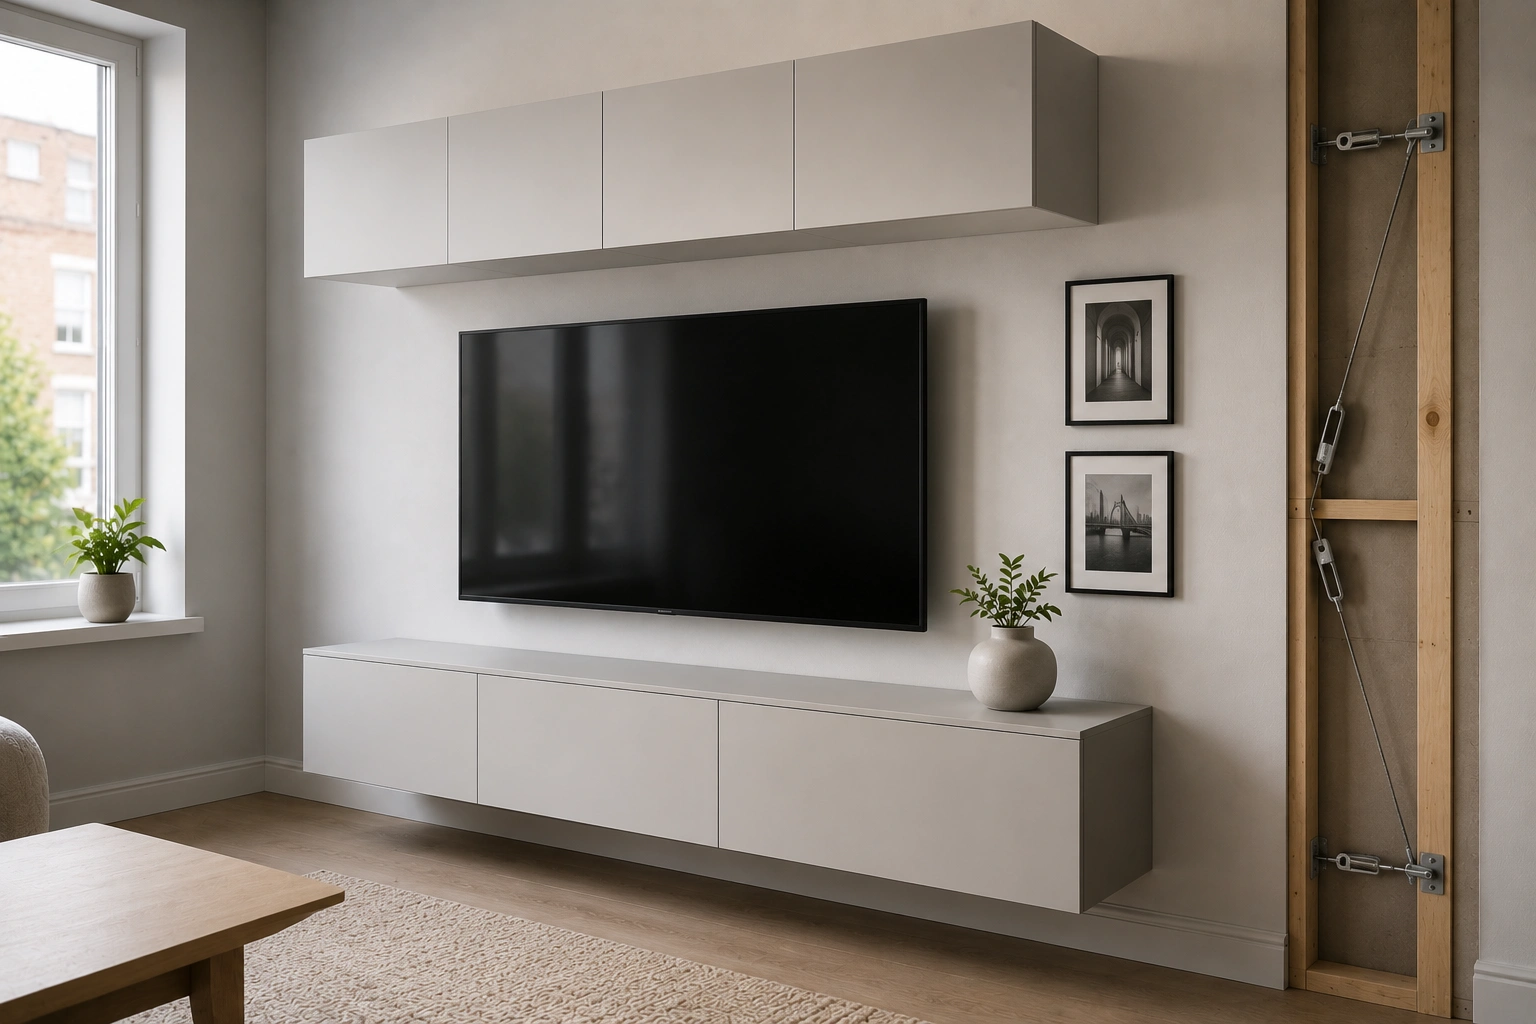
Many configurations are designed to be wall-mounted using a suspension rail, while others combine floor support with wall anchoring for additional stability.
The suspension rail spreads the cabinet’s weight across several fixing points instead of placing pressure on only a few screws. This creates a stronger installation when fitted correctly.
IKEA recommends using one suspension rail for every 60 cm cabinet and ensuring the wall can safely support both the furniture and everything stored inside it.
| Wall Type | Installation Difficulty | Typical Fixing Method | Suitable for BESTA? |
|---|---|---|---|
| Solid Brick | Easy | Masonry plugs and screws | Yes |
| Concrete | Moderate | Heavy-duty masonry anchors | Yes |
| Plasterboard with Timber Studs | Moderate | Fix directly into studs where possible | Yes |
| Plasterboard without Stud Access | Higher | Specialist cavity anchors | Depends on load |
| Metal Stud Walls | Higher | Metal cavity fixings | Requires careful assessment |
Wall Fixing Selector & Anchor Guide
Determine the safest structural fixing methods, anchor choices, and drill configurations for your walls.
*Disclaimer: This tool calculates basic geometric shear weight limits. Always check for hidden internal electrical cables or water plumbing lines behind target drilling zones with a detector tool.
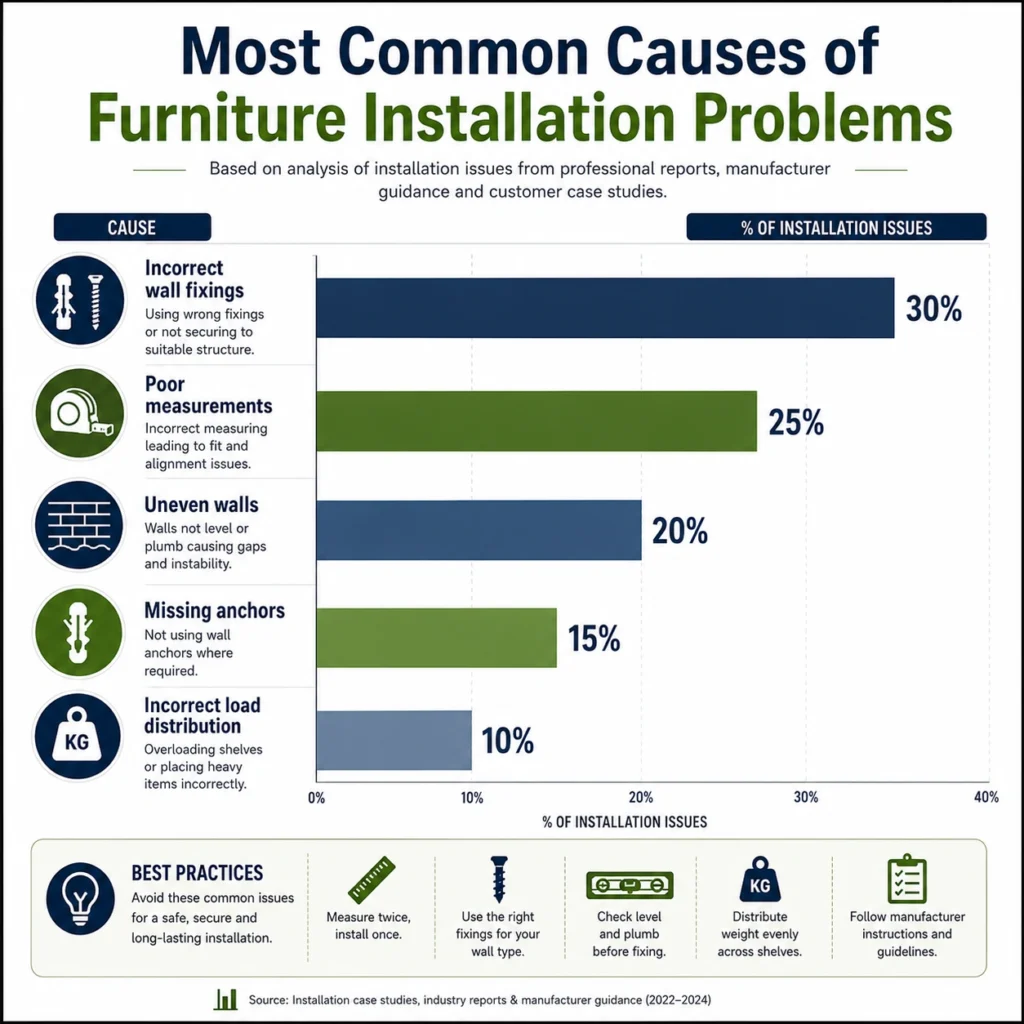
The Biggest Mistakes People Make During IKEA BESTA Assembly
Many installation problems happen before the first screw even goes into the wall.
Assuming Every Wall Is the Same
London homes range from Victorian terraces to modern apartment blocks. Each uses different construction methods, meaning the safest fixing method changes from property to property.
Installing into plasterboard without suitable anchors can reduce the cabinet’s ability to support weight safely.
Ignoring Weight Distribution
Many people fill upper shelves with books, electronics or decorative items immediately after installation.
Although BESTA cabinets are strong, placing excessive weight high up increases stress on the wall fixings.
Keeping heavier objects lower improves overall stability.
Skipping Wall Anchoring
Some renters avoid drilling because they worry about losing their tenancy deposit.
Unfortunately, this creates a greater safety risk.
IKEA clearly recommends securing cabinets to the wall to reduce the chance of furniture tipping or falling, particularly where children may be present.
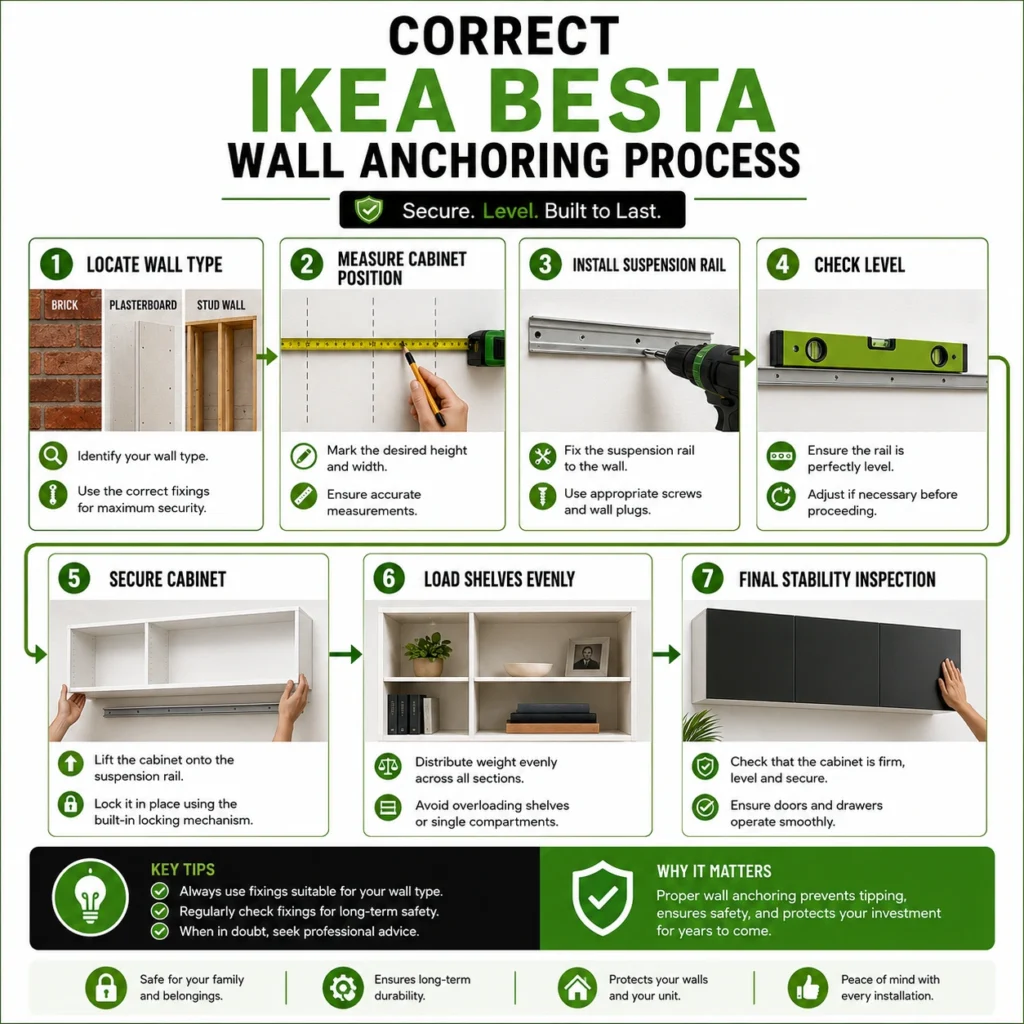
Step-by-Step Guide to Safe Wall Anchoring
Every successful IKEA BESTA assembly starts with preparation rather than power tools.
Step 1: Identify the Wall Material
Before unpacking the cabinet, determine whether the wall is:
- Brick
- Concrete
- Plasterboard
- Timber stud
- Metal stud
This single step determines every fixing you’ll use afterwards.
Step 2: Read the Assembly Instructions Carefully
Even experienced DIY enthusiasts benefit from reviewing the manufacturer’s guide.
IKEA regularly updates installation recommendations to improve product safety.
Their instructions also explain when suspension rails should be used and where fixing points should be positioned.
Step 3: Check the Wall Can Support the Load
Remember that you’re not only supporting the cabinet.
You’re supporting:
- Cabinet weight
- Shelves
- Doors
- Electronics
- Books
- Decorative items
The combined load is often far greater than many people expect.
Where Professional Furniture Assembly Can Save Time
Wall-mounted furniture requires far greater accuracy than standard flat-pack furniture.
Even a few millimetres of error can leave cabinet doors uneven or create unnecessary pressure on fixing points.
This becomes even more important when working inside rental homes where unnecessary wall damage could affect the tenancy deposit.
Professional installers understand different wall constructions, appropriate fixing methods, and manufacturer recommendations for systems like BESTA. Many homeowners who also require IKEA PAX assembly London services choose to complete both wardrobe and living room installations during the same visit, ensuring consistent quality throughout the property.
Keeping Your IKEA BESTA Unit Safe for Years
A properly installed BESTA unit should remain stable for many years, but it is still worth checking it from time to time. Small movements caused by daily use, vibrations from closing doors, or changes in room temperature can gradually loosen fittings.
Every few months, inspect the cabinet to make sure it remains level and firmly attached to the wall. If you notice gaps between the cabinet and the wall or doors that no longer close evenly, investigate the cause before adding more weight.
Avoid overloading shelves beyond the limits recommended by IKEA. Heavy items such as large books, speakers, or storage boxes should be placed on the lower shelves to improve stability and reduce strain on the wall fixings.

Rental Wall Repair Estimator
Estimate the time, required materials, and effort needed to patch up wall anchor drill holes before moving out.
*Time estimates include active working time and drying intervals required between filler layers and final topcoats.
What Happens When It's Time to Move Out?
One of the biggest concerns for tenants is restoring the property before handing back the keys.
If your tenancy agreement allowed wall fixing, removing the cabinet carefully can minimise repair work. Small screw holes can often be filled with suitable filler and touched up if permitted by the landlord or letting agent.
Before removing any fixings:
- Empty the cabinet completely.
- Support the cabinet while removing wall fixings.
- Remove the suspension rail carefully.
- Fill holes using an appropriate wall filler.
- Check the tenancy agreement before repainting.
Taking photographs before and after removal can also help if questions arise during the deposit inspection.
Ready to get started? Contact The Italian Tasker today for all your handyman and furniture assembly needs in London. We’re here to make your life easier and your home more functional and beautiful.
Why Correct Installation Is About More Than Appearance
Many people think furniture assembly is mainly about making everything look neat. In reality, safety is the biggest reason to install wall-mounted furniture correctly.
According to the UK Government’s Office for Product Safety and Standards (OPSS), unsecured furniture can contribute to preventable accidents in the home, especially where children are present. Manufacturers also continue to improve safety guidance to reduce tip-over risks.
Research from the Royal Society for the Prevention of Accidents (RoSPA) shows that thousands of people are injured each year in home accidents, many involving furniture, falls, or household hazards. While not every incident involves wall units, secure installation plays an important role in reducing avoidable risks.
Correct anchoring also protects your investment. A cabinet that remains level is less likely to suffer damaged doors, warped panels, or loose joints over time.
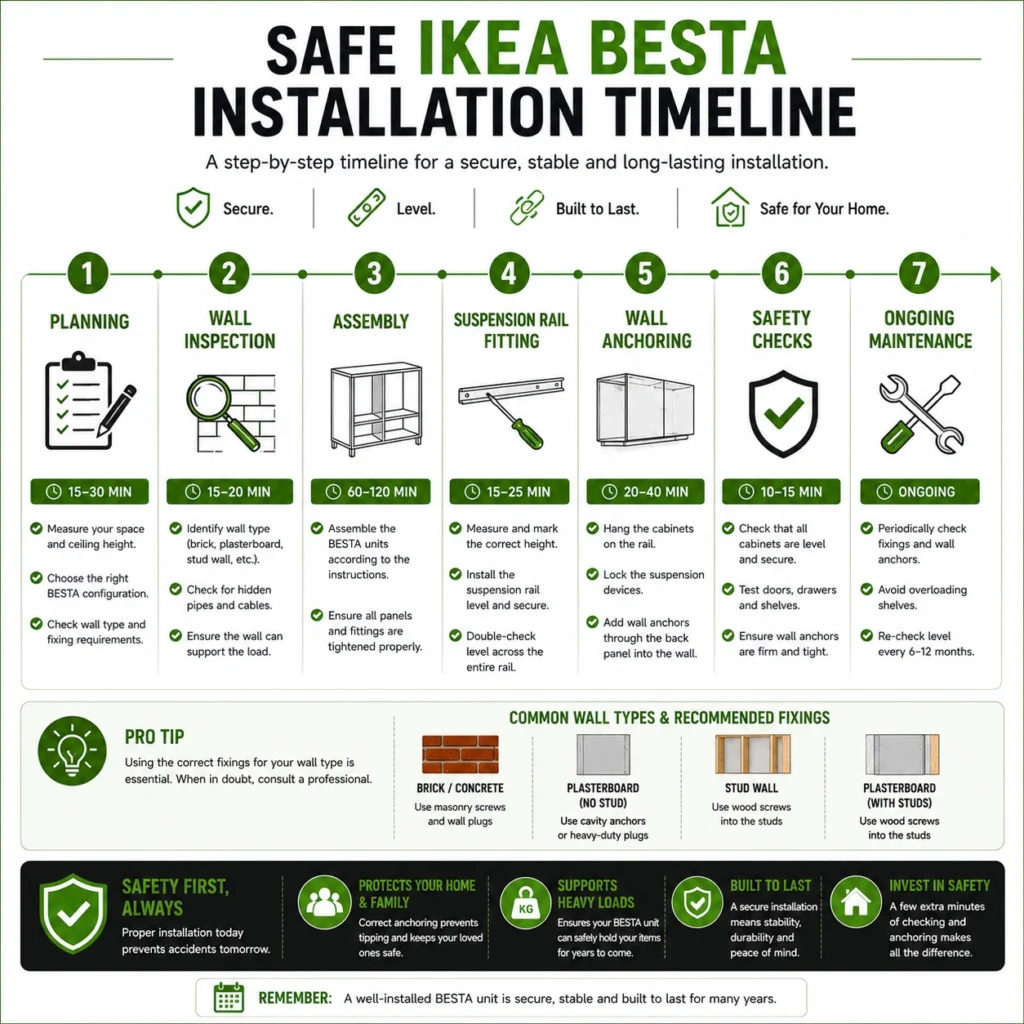
When Should You Ask for Professional Help?
Some BESTA installations are straightforward, while others become more complex because of the building itself.
Professional assistance is worth considering when:
- The wall type is unknown.
- The property has metal stud walls.
- The cabinet will support a large television.
- Multiple BESTA units need to be aligned together.
- The installation includes integrated lighting or cable management.
- The landlord has requested minimal wall damage.
Experienced furniture assemblers understand how different wall materials behave and can select appropriate fixings that match both the manufacturer’s guidance and the building’s construction.
If you’re also planning an IKEA PAX assembly London project, arranging both installations together can help ensure accurate measurements, consistent alignment, and efficient use of time while reducing disruption in your home.
Every London property is different, and that’s exactly why no single installation method works for every home. Taking the time to identify your wall type, follow the manufacturer’s instructions, and use suitable fixings can make the difference between a cabinet that stays secure for years and one that becomes a safety concern.
Whether you’re installing a single TV bench or creating a full wall of storage, careful planning always pays off. Have you already assembled a BESTA unit in your rental property, or are you preparing for your first installation? Share your experience or questions—we’d love to hear how you’re making your space safer and more practical.
Frequently Asked Questions
1. Can IKEA BESTA units be safely mounted in a rental property?
Yes, IKEA BESTA units can be mounted safely in most rental properties, provided you have your landlord’s permission if required by your tenancy agreement. The correct wall fixings must be used based on the wall type, such as brick, concrete, or plasterboard, to ensure a secure installation.
2. Does IKEA BESTA need to be attached to the wall?
Yes. IKEA recommends securing BESTA wall units to the wall to reduce the risk of tipping or falling. Proper wall anchoring improves safety and helps support the weight of the cabinet and its contents.
3. What type of wall is best for IKEA BESTA wall mounting?
Solid brick and concrete walls generally provide the strongest support for IKEA BESTA units. However, plasterboard walls can also be suitable when installed correctly using appropriate wall anchors or by fixing into timber studs.
4. Can I install IKEA BESTA on a plasterboard wall?
Yes, but you must use the correct fixing method. If possible, mount the unit directly into wall studs. If studs are unavailable, heavy-duty plasterboard anchors designed for the cabinet’s weight should be used. Always follow IKEA’s installation guidance.
5. How long does IKEA BESTA assembly take?
A standard IKEA BESTA assembly usually takes between 2 and 4 hours, depending on the size of the unit, the number of cabinets, whether wall mounting is required, and your level of DIY experience. Larger entertainment wall systems may take longer.
6. Can a professional assemble and mount IKEA BESTA furniture in London?
Yes. Professional furniture assembly services can assemble and securely mount IKEA BESTA units throughout London. Experienced installers understand different wall constructions, helping ensure a safe installation while minimising unnecessary wall damage.
7. What tools are needed for IKEA BESTA assembly?
Most IKEA BESTA installations require a screwdriver, drill, spirit level, tape measure, stud finder (for plasterboard walls), pencil, suitable wall plugs, screws, and the correct suspension rail if applicable. The exact tools depend on the wall material.
8. Can IKEA BESTA support a TV?
Yes. Many IKEA BESTA TV benches and wall units are designed to support televisions within the manufacturer’s specified weight limits. Always check the product specifications and ensure the cabinet is securely anchored to a suitable wall.
9. Is professional IKEA PAX assembly available alongside IKEA BESTA assembly in London?
Yes. Many professional furniture assembly companies offer both IKEA PAX assembly London and IKEA BESTA assembly during the same visit. This is a convenient option if you’re furnishing multiple rooms at once.
10. Why should I hire a professional for IKEA BESTA assembly?
Hiring a professional helps ensure accurate assembly, correct wall fixings, safe installation, and proper alignment of cabinets and doors. It can also save time and reduce the risk of damage to both the furniture and your property.